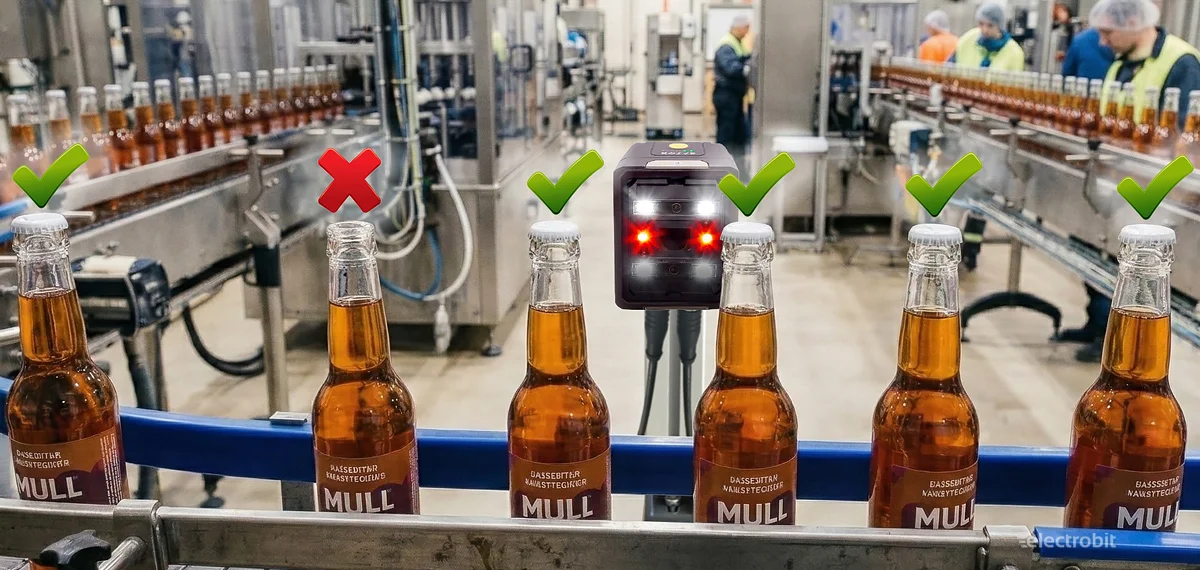
Are all screws in place and the cap on the bottle? A smart way to control quality in the production process
Photoelectric sensors have long been the “eyes” of production process control — they are used to check whether a component is present, whether a bottle is moving along the line, or whether a package is in the correct position. But technology does not stand still. Today, in addition to classic sensors, machine-learning-based vision sensors have also entered production. These sensors can not only detect presence, but also assess whether something has actually been done correctly.
In this post, we take a closer look at the vision sensor DATALOGIC Smart-VS-MR-5-150-WH-O, which uses machine learning. It is the simplest model in the Datalogic Smart-VS vision sensor series – a good starting point for those who want to implement visual inspection in a production process without a complex system.
We will run a practical experiment: configure the sensor step by step, teach it what a “correct” and “incorrect” object looks like, and see what results it delivers in a real situation.
Short overview of the DATALOGIC Smart-VS-MR-5-150-WH-O vision sensor
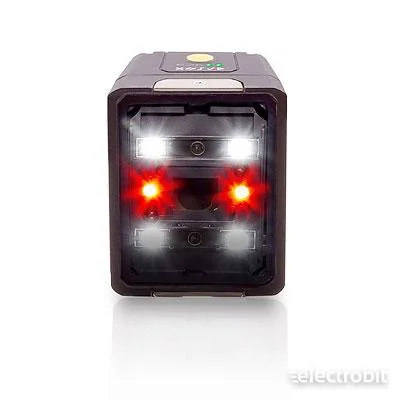
Before we proceed with the experiment, let’s briefly review the main technical characteristics of the vision sensor DATALOGIC Smart-VS-MR-5-150-WH-O used in our test. It is a compact machine-learning-based vision sensor designed for simple detection tasks – for example checking the presence of caps, verifying part orientation, or, as in our test, detecting the presence of screws.
Main technical specifications
- Resolution: 320 × 240 pixels
- Sensor: monochrome camera
- Working distance / focal range: approx. 50–150 mm
- Field of view:
- ~22 × 16 mm (at 50 mm distance)
- ~55 × 41 mm (at 150 mm distance)
- Integrated lighting: polarized white LEDs
Images and learning
The standard version allows storing up to 6 reference images (“GOOD” and “NO GOOD” examples). Based on these images, the machine learning algorithm creates a model used to classify objects. Higher models in the series allow storing 20 or even 50 images.
Speed
- Detection time: approx. 50 ms
- Maximum inspection speed: up to 20 parts per second
Connections
The sensor includes several standard industrial interfaces:
- Ethernet 10/100 Mbit/s (for configuration via web interface)
- M12 17-pin connector for inputs and outputs
- Digital outputs: PNP / NPN / Push-Pull (GOOD / NO GOOD / DATA VALID signals)
In practice, this means the sensor is primarily a vision sensor designed for simple inspection tasks, rather than a full-featured vision camera. However, its main advantage is easy setup – the object can be trained using just a few images and no separate programming is required.
Part used in the experiment
In assembly processes where components are fixed with screw connections, a common problem is that one screw may remain uninstalled – either due to human error or a robotic malfunction. If the connection is critical, such a quality issue can quickly become very costly or even dangerous. Therefore, it is important that the production process includes a reliable inspection system confirming that all fastening elements are in place.

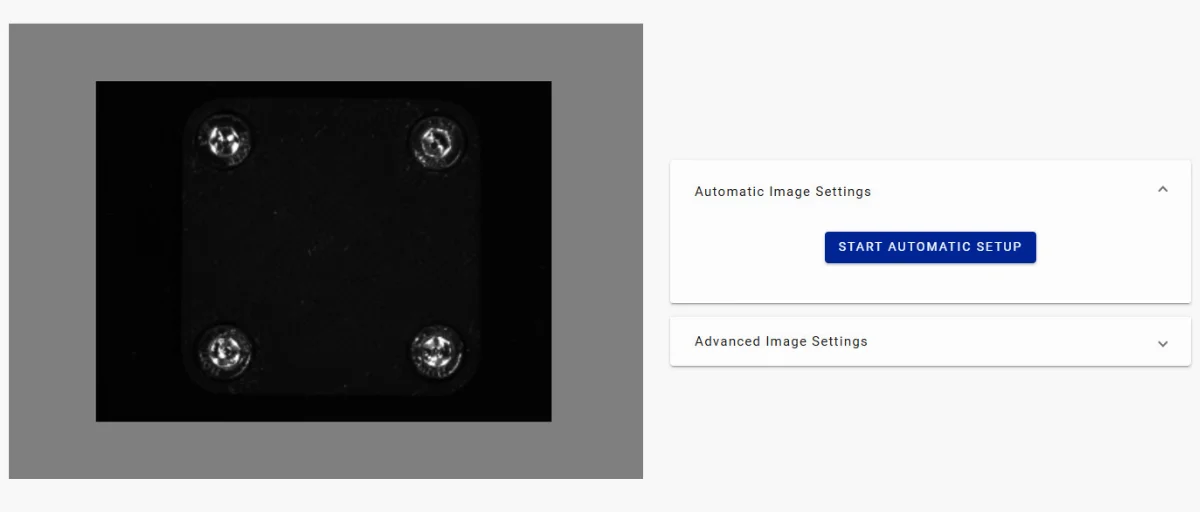
For the experiment, we 3D-printed a simple test part and installed four DIN 912 standard M4 zinc-plated hex socket screws. The black part and the metallic screw heads provide sufficient contrast for the vision sensor to easily distinguish them. During the test, we will check whether the DATALOGIC Smart-VS-MR-5-150-WH-O can reliably detect situations where one or more screws are missing.
Some important things before using a vision sensor
Before continuing with the experiment, it is worth pausing for a moment to discuss several practical aspects that should always be considered when using cameras, vision sensors, or even simple photoelectric sensors. Most detection problems do not come from the sensor itself, but from the environment – lighting, background, or positioning.
Lighting – the most important factor
When we detect something using a camera, vision sensor, or photoelectric sensor, we are actually detecting light contrast or, in some cases, color differences. Therefore, it is extremely important that the lighting is strong enough and as stable as possible. If sunlight hits the part in the morning but in the evening or on cloudy days the lighting conditions are completely different, the image will also change and the detection may no longer be stable.
Many vision sensors do have their own light source. For example, the DATALOGIC Smart-VS-MR-5-150-WH-O sensor we are testing also includes two fairly powerful LEDs. However, practical experience shows that in industrial environments the built-in lighting of the camera is often still too weak. Therefore, a simple rule applies: if you want stable detection, create your own constant lighting for the part.
Background – contrast is the key
Another very important aspect is the background. The object being detected must stand out sufficiently from the background so that the vision sensor can create a clear contour model of the part. For example, a black object on a black background is usually a very poor combination – the contour becomes difficult to distinguish.
In our experiment, however, the situation is slightly different. We are using a black part on a black background deliberately, because we are not interested in the contour of the part. Instead, we want to detect the screw heads. Since the zinc-plated screws provide strong contrast against the black part, their presence or absence is clearly visible to the vision sensor. In other words, the background does not always have to be contrasting; it should be chosen according to what exactly you want to detect.
Distance and focus
The third important parameter is the distance between the object and the camera. The vision sensor used in our test, DATALOGIC Smart-VS-MR-5-150-WH-O, has an adjustable focus, but its maximum working range is about 150 mm. (The next models in the same series already reach up to 400 mm working distance.) This means that our test object must remain within 150 mm of the sensor; otherwise the image will no longer be sharp or reliable.
Detection speed
The final factor – and in some applications the most critical one – is detection speed. If the production line moves slowly, a detection time of 50 milliseconds is not a problem. But in some packaging lines, a part may pass the camera very quickly. If, for example, a bottle passes the camera in 15 milliseconds, then 50 ms image processing will no longer be sufficient. Therefore, when choosing a vision solution, it is always important to consider how quickly the system must make a decision.
Configuration
Datalogic Smart-VS vision sensors include a built-in web server, so no additional software or complicated installation is required – all configuration is done directly in a web browser.
The configuration manual is available on our website:
https://electrobit.ee/file_bank/Vision/806000510_Smart-VS_plus_prg_eng.pdf
The manual shows that the default IP address of the vision sensor is 192.168.3.100. Entering this address in a browser opens the sensor’s web interface.
The main page opens, showing an overview of the device status and basic settings. In the top-right corner there is a menu icon – clicking it allows you to move to the Dashboard view:
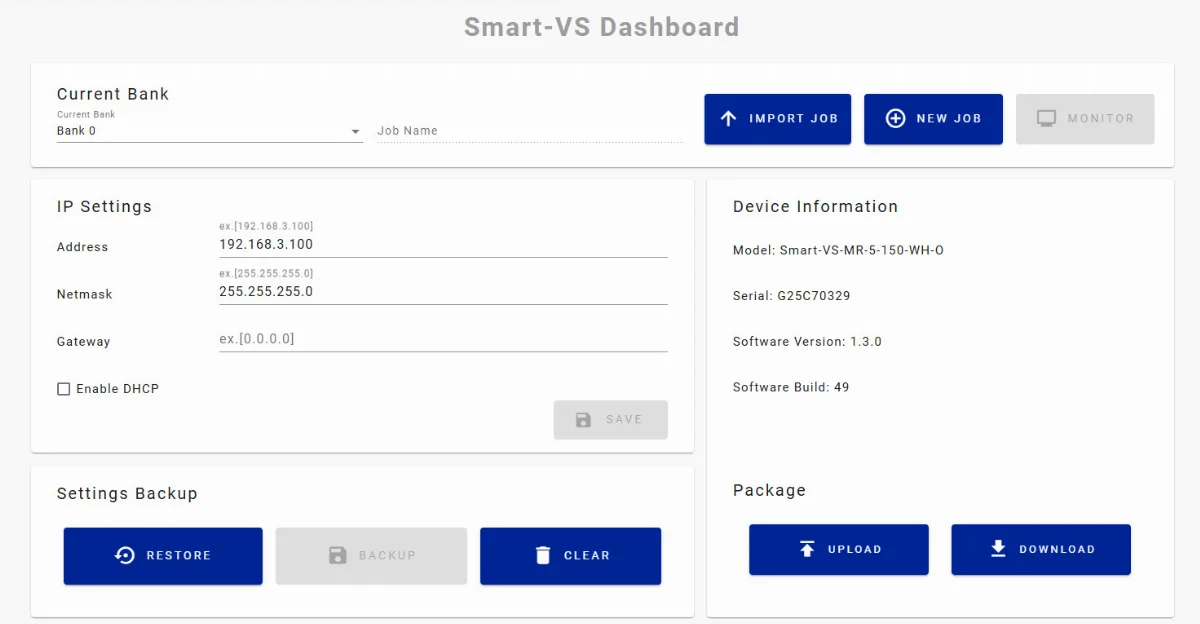
In the Dashboard, the next step is to select the job that you want to configure or test. You can either choose an existing job or create a completely new one.
Creating a job
The Smart-VS vision sensor allows jobs to be stored in banks – think of them as storage locations for work plans or configurations. Each job is saved in its own bank, which makes it easy to manage configurations for multiple parts or production lines.
- One sensor can contain up to 32 banks, each with its own job.
- Each job can be assigned a unique name, making it easy to find the correct configuration later.
This means that if there are several different parts in production that the vision sensor must inspect, a separate bank can be created for each configuration. For example, one bank may be used for screw inspection, another for cap detection, and a third for checking label presence.
The bank system also makes testing convenient – once a job is configured, it can be saved and reused later without reconfiguration. It also allows quick switching between jobs, which speeds up production line setup and reduces the risk of errors.
Create a new job and continue:
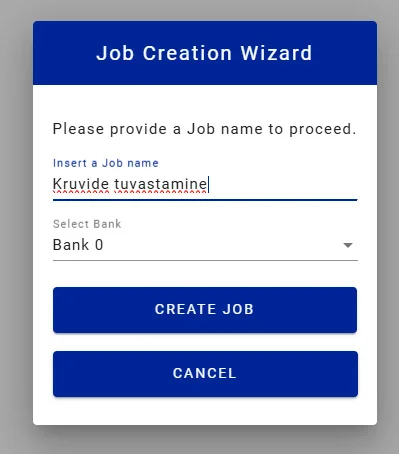
Image settings
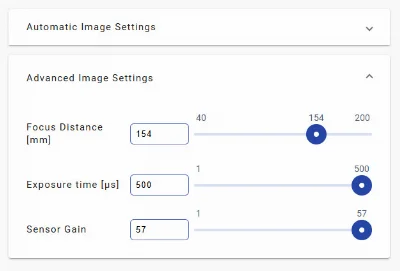
Datalogic Smart-VS vision sensors offer flexible image configuration – you can either use automatic tuning or switch to manual settings.
The main image parameters that can be configured are:
- Focal length
- Exposure time
- Sensor gain
Automatic configuration is usually a very good starting point, especially when starting from scratch or when conditions are standard. The system automatically selects suitable exposure and gain values and attempts to find the optimal focus.
In practice, however, automatic focus detection may not always produce a perfect result – especially when the object has few strong contour points or when lighting conditions are more complex. In such situations it is worth checking and adjusting the focus manually.
When should manual adjustment be used?
- If the automatic focus does not produce a sharp and clear image
- If contrast or lighting needs adjustment
Often the best solution is to combine both approaches: use automatic configuration as a starting point and then make small manual adjustments to achieve the optimal result.
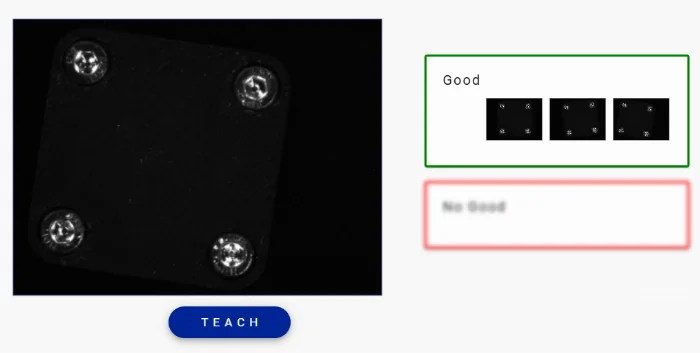
Training
Once the camera is properly configured and the image is clear, you can move on to the training phase. This is where the sensor learns what a part that meets quality requirements looks like and what does not.
The DATALOGIC Smart-VS-MR-5-150-WH-O allows storing up to 6 reference images – both GOOD and NO GOOD examples.
These images do not need to be evenly distributed. For example:
- 2 good and 4 bad
- 4 good and 2 bad
- 3 good and 3 bad
The system does not require a specific ratio – the important thing is that the sensor is shown enough different situations to learn from.
Practical advice when training
It is good practice to slightly change the position of the part when taking each training image, especially if the position of the part may naturally vary during production.
Why is this important?
If the part is always in exactly the same position during training, the sensor may later incorrectly assume that a small rotation or positional shift indicates an error. In reality, this can be a completely normal part of the production process.
Therefore it is recommended to:
- Rotate the part to different angles during training
- Slightly shift its position
- Ensure that the lighting remains the same while the part position varies
In our experiment
We trained the sensor with:
- Good images – the part with four bolts, with small variations in position
- Bad images – situations where one or more bolts were removed
This approach allows the system to clearly distinguish between situations where all fastening elements are present and situations where something is missing.
Once the training is complete and the model is saved, the sensor is ready for real tests – in the next step we will see how the inspection works in a real situation and what kind of results it produces.
Testing
After the training was completed, we moved on to the most interesting part – practical testing.
The first test was carried out with a light background. However, something interesting happened: the machine learning model started paying more attention to the contour and position of the part itself, rather than the presence of the bolt heads.
The reason was quite logical. The black test part on a light background created very strong contrast, and the contour of the part became the most dominant feature in the image. As a result, the system focused more on whether the part was in exactly the same position as during training rather than checking if all bolts were present.
This is a good example of how background and contrast can significantly influence machine learning behavior.
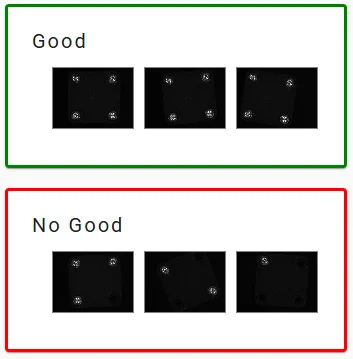
Changing the background
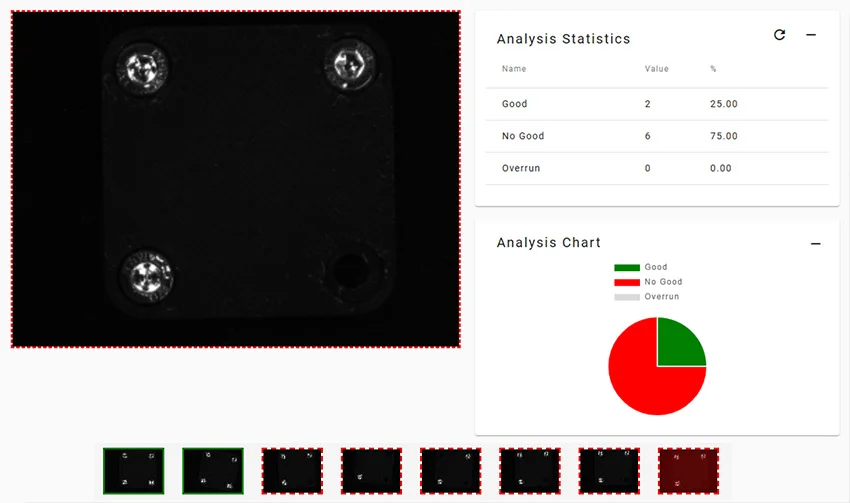
Next we made a simple change – we switched the background to black.
The goal was to remove the strong contrast between the part contour and the background so that the vision sensor could no longer use the contour as the main feature. This made the most visible contrast in the image the metal bolt heads on the black part.
Result
After changing the background, we repeated the tests with several different combinations:
- all bolts in place
- one bolt missing
- two bolts missing
- the part slightly shifted in position
The result was excellent. During the tests the vision sensor provided 100% correct results, and detecting missing bolts worked completely reliably.
This experiment once again confirmed one of the fundamental rules of vision systems:
very often the most important factor is not the algorithm or the sensor itself, but creating the right image – proper lighting, background, and contrast.
If these three factors are correct, even a relatively simple vision sensor can deliver very reliable results.
Summary
Datalogic Smart-VS-MR-5-150-WH-O vision sensor is a very capable tool for production process quality control.
In our experiment we used the simplest model in the Smart-VS series, yet it still performed excellent bolt presence detection. With the correct background and configuration we achieved 100% correct detection results in our test.
Main advantages of the solution
The device has a built-in web interface and all configuration is done directly in the browser. This means that even a tablet can be placed at the operator’s workstation, allowing them to:
- create new jobs
- modify existing configurations
- monitor statistics and results
Unlike traditional vision systems, it does not require special software or deep knowledge of vision programming.
The DATALOGIC Smart-VS-MR-5-150-WH-O costs under €1000 (excluding VAT) + cables. This is significantly cheaper than full-featured intelligent vision cameras.
In addition, the implementation cost is practically zero – in most cases the production operator can complete the configuration without the need for a separate specialist.
The main limitation is the relatively short working distance. With this specific model the camera and the object must be positioned quite close to each other (up to about 150 mm).
If the application requires more distance, other models in the same series support working distances up to about 400 mm, which provides significantly more installation flexibility.
Overall, this experiment shows that a machine-learning-based vision sensor can be an excellent solution in situations where simple, fast and affordable visual quality inspection is required – for example checking the presence of screws, bottle caps, or packaging elements on a production line.
However, it is important to remember that this is not a full vision system. For example, this camera cannot read text, codes, or symbols. However, it can still detect whether something has been printed or not – for example whether a marking exists on a package or is completely missing.
In other words, in some applications this type of vision sensor performs the task perfectly, while in others it may reach the limits of its capabilities. Choosing the right solution always depends on the specific task – what exactly needs to be detected, the required speeds, and the environmental conditions.
If you have a similar quality control task in production, feel free to consult with us. We can help evaluate the application and select a solution that truly works reliably.
Explore Datalogic vision sensors: SMART Vision Sensors – Information and Sales | Electrobit OÜ